Results for ""
DETaiLED 8 Min Read Sep 03, 2021
DETaiLED - Building a Sentiment Classifier using spaCy 3.0 Transformers

I have been using spaCy for quite some time because of its easy usage in production and its crisp, user-friendly API. The library was developed by Matthew Honnibal and Ines Montani, the founders of the company Explosion.ai. They have released the spaCy 3.0 version on February 1, 2021, and added state-of-the-art transformer-based pipelines. Also, version 3.0 comes with a new configuration system and training workflow. In this article, I show how simple to build a sentiment classifier with very few lines of code using spaCy version 3.0 with Transformer models.
I have taken financial news dataset from Kaggle to build a sentiment classifier and used Google Colab.
Installation
# Installing Spacy library

!pip install spacy==3.1.1
!pip install spacy-transformers
Next, download the pre-trained transformer model. Here, the model is Roberta-base using BERT-base architecture. For more details, please check here.
# Downloading the spaCy Transformer model "en_core_web_trf"
!python -m spacy download en_core_web_trf
Importing necessary library
# Importing libraries

import pandas as pd
from datetime import datetime
import spacy
import spacy_transformers

# Storing docs in binary format
from spacy.tokens import DocBin
Reading the dataset
# Reading the dataset
df = pd.read_csv("Data1.csv", encoding='latin-1')
df.head()

This dataset is about financial news and its corresponding sentiments. The data has three labels, positive, negative and neutral. Let’s read some random texts
df[‘Text’][2]

The above text is classified as “negative”. Let’s read one positive text
df['Text'][3]

The above text is classified as “positive”.
Checking the shape of the dataset
df.shape
The data has 4846 observations. I have selected a small dataset in this article due to training time.
Splitting the dataset
Splitting the dataset into train and test with 80:20 ratio
#Splitting the dataset into train and test

train = df.sample(frac = 0.8, random_state = 25)
test = df.drop(train.index)
Checking the shape
# Checking the shape

print(train.shape, test.shape)
Output
![]()
Loading the transformer model into a spacy pipeline
import spacy
nlp=spacy.load("en_core_web_trf")
Train the dataset
In version 3.0, we need to create a training dataset in a binary format to train a model. The first step is to create tuples which are pairs of text along with sentiments. Creating tuples for both train and test datasets.
#Creating tuples

train['tuples'] = train.apply(lambda row (row['Text'],row['Sentiment']), axis=1)
train = train['tuples'].tolist()
test['tuples'] = test.apply(lambda row: (row['Text'],row['Sentiment']), axis=1)
test = test['tuples'].tolist()
train[0]

The second step is to create a spaCy document for each tuple in the train and test dataset with the help of a transformer model (en_core_web_trf)using a spacy pipeline called nlp. Each tuple is nothing but text and its sentiments.
# User function for converting the train and test dataset into spaCy document

def document(data):
#Creating empty list called "text"
  text = []
  for doc, label in nlp.pipe(data, as_tuples = True):
    if (label=='positive'):
      doc.cats['positive'] = 1
      doc.cats['negative'] = 0
      doc.cats['neutral']  = 0elif (label=='negative'):
      doc.cats['positive'] = 0
      doc.cats['negative'] = 1
      doc.cats['neutral']  = 0else:
      doc.cats['positive'] = 0
      doc.cats['negative'] = 0
      doc.cats['neutral']  = 1
#Adding the doc into the list 'text'
      text.append(doc)
  return(text)
Created the above user-defined function called document. Here, processing the text and adding to the spaCy document and add categories to each sentiment. If the text has positive sentiment, then it is assigned as ‘1’, and the same for both neutral and negative. Then each of the doc is added to the list called text. The final textis the internal spacy representation of the text.
Converting train and test dataset into binary format
Pass the traindataset to the document function and save it as train_docs object. Then convert the texts into binary objects using DocBin spaCy function and save the train dataset binary object as train.spacy
# Calculate the time for converting into binary document for train dataset

start_time = datetime.now()

#passing the train dataset into function 'document'
train_docs = document(train)

#Creating binary document using DocBin function in spaCy
doc_bin = DocBin(docs = train_docs)

#Saving the binary document as train.spacy
doc_bin.to_disk("train.spacy")
end_time = datetime.now()

#Printing the time duration for train dataset
print('Duration: {}'.format(end_time - start_time))
![]()
It took close to 7 minutes to convert the training dataset into a binary object in Google Colab.
The same thing we have to do for the test dataset. Pass the testdataset to the document function and save it astest_docs object. Then convert the texts into binary objects using DocBin spaCy function and save the test dataset binary object as test.spacy
# Calculate the time for converting into binary document for test dataset

start_time = datetime.now()

#passing the test dataset into function 'document'
test_docs = document(test)
doc_bin = DocBin(docs = test_docs)
doc_bin.to_disk("valid.spacy")
end_time = datetime.now()

#Printing the time duration for test dataset
print('Duration: {}'.format(end_time - start_time))
![]()
It took 1.40 minutes to convert the test dataset into a binary object in Google Colab. Now we have our input data into the binary objects as per the required format of spaCy.
Train the model
Next step, to train the model. In version 3.0, spaCy provides a command-line interface to perform training. For that, we need to download the base configuration file from this site. Before downloading, we need to select textcat under components as this is a classification problem. I selected hardware GPU as I used google colab and selectedaccuracy.
Image by the author
We can open the base configuration file in the notepad and needs to specify the path for train = “train.spacy"and dev = "test.spacy". Screenshot of the config file as below
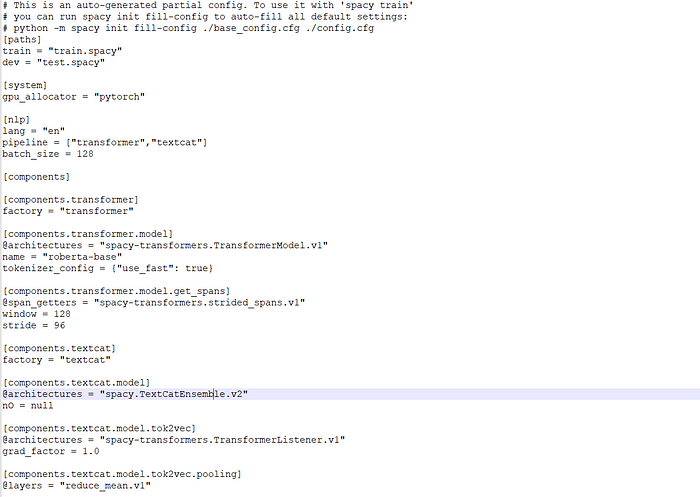
Image by the author
The next step is to use the base configuration and convert it into the full configuration for our classification using the below code. The below code is available on the spaCy site. A full configuration file will save in your path folder as config.cfg
#Converting base configuration into full config file

!python -m spacy init fill-config ./base_config.cfg ./config.cfg
The configuration file has all the model parameters for training the classification. I’ve used default parameters in this article and trained the classification. Now, we need to use the below code to train our model. Again the code is available on the spaCy site. I enabled GPU by adding --gpu-id 0 and model output was saved in a folder called output_updated.
#Calculating the time for training the model
start_time = datetime.now()

# To train the model. Enabled GPU and storing the model output in folder called output_updated
!python -m spacy train config.cfg --verbose  --gpu-id 0 --output ./output_updated

end_time = datetime.now()
#Printing the time taken for training the model
print('Duration: {}'.format(end_time - start_time))
Output
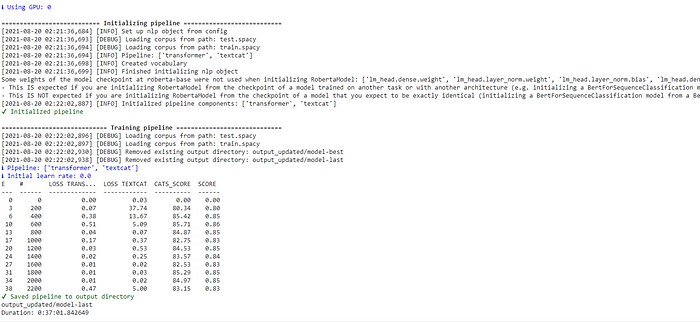
It took 37 minutes to train the model in Google Colab under GPU. The above output shows the loss and accuracy for each training step. I can see the model has an accuracy of 0.85. After training, the model was saved in the folder output_updated/model-last.
Testing the model
Now our model is ready. Let’s test with some random texts
text = “Australia’s largest airline temporarily lays off 2,500 employees”

# Loading the best model from output_updated folder
nlp = spacy.load("output_updated/model-best")
demo = nlp(text)
print(demo.cats)
Output
![]()
A negative score is high and it is correctly classified as a negative. Let’s try with some positive text
text1 = “Apple earnings: Huge iPhone 12 sales beat analyst expectations”
demo = nlp(text1)
print(demo.cats)
Output
![]()
Yes, the sentiment of the text is positive as a positive score is high. Model classified correctly.
The purpose of this article is to demonstrate how to do text classification using spaCy transformers 3.0. We can change the parameters in the configuration file to improve the model performance.
You can find the entire code and data in my GitHub repo.